Tuesday, June 30, 2009

DIY Solar Hot Water

Some things have been nagging me lately about solar hot water collectors. Take a look at this chart.


You can find this graph here and they also say the following about the evacuated tube:

(Note -- it appears that the low efficiency of evacuated tubes at low delta temperatures is due to the fact that the SRCC uses the full area of the collector array when calculating performance, and the evacuated tube arrays have lots of open space that do not collect. This brings down their efficiency. If you calculate efficiency based on absorber area, the evacuated tubes are near 80% at the intercept. But, it seems to me that the SRCC is correct in basing the efficiency on the actual size of the array -- that's how much roof space it takes up).

So it appears that the evacuated tubes are only efficient when you look at the absorber area (the black inner tube area). But since there is space taken up by the outer glass shell and there is space between each tube in the array, then the effective efficiency goes down. If you are trying to boil water, then sure, these are great. But in my opinion, way too expensive for what you get in a normal water heating situation.

If you look at the unglazed part of the graph, this is like the pool heaters. They are just flat black plastic that the water flows through. They are really efficient when the outside air temp is close to the water temp.

What I propose is to use an inefficient design that doesn't raise the water temp very much. But the good part is the massive surface area that it utilizes. Most solar water collectors are between 10 and 30 square feet. I propose something like 800 square feet. Like the roof of your house.

Imagine using a homemade plywood water tank like here


http://www.builditsolar.com/Experimental/PEXColDHW/TankConstruction.htm . It is 160 gallon, but you could make it up to 300 gallons. It would store the water that is circulated to the roof. Inside the tank would be some PEX hose that goes to the pool pump and another length of hose that goes to the water heater in the house and a small circ pump for that. The pool has its own pump. You could also have a loop for a hot tub as well. The water that goes to the roof never comes in contact with the water that goes to the pool or hot water tank. It just transfers heat to it inside the plywood tank. In other words, the PEX tubing acts as a heat exchanger because it sits inside 160 gallons of hot water that is circulated to the hot roof and back again.

With the hot water tank, you might need to purchase an anti-scald valve because the water temp could get above 150F or so. On average you will probably see about 50 degrees F above ambient air temp on sunny days. But that is great for adding heat to the pool in the spring and fall. And good hot water for the house in the summer.

You could build a tank and get a pump for pushing water to the roof and a small circ pump for the house hot water and various piping for about $500. But a typical solar hot water device could be $2,000 up to $8,000. You could use a soaker hose at the roof peak or you could use a sprinkler head pointed at the right spot or however you would like to do it. But let's say you have a 20 foot by 40 foot area of the roof that gives you 800 square feet of heating area. This also helps cool your house in the summer.

At 70F sunny day and water temp at 100F, therefore 30F delta temp:
20 sq. ft flat plate - 65% eff. ==> 1209 watts of power
20 sq. ft evac. tube - 50% eff. ==> 930 watts
800 sq. ft roof area - 50% eff. ==> 37,000 watts

At 90F sunny day and water temp at 130F, therefore 40F delta temp:
20 sq. ft flat plate - 60% eff. ==> 1116 watts of power
20 sq. ft evac. tube - 48% eff. ==> 893 watts
800 sq. ft roof area - 38% eff. ==> 28,272 watts

At 70F sunny day and water temp at 130F, therefore 60F delta temp:
20 sq. ft flat plate - 55% eff. ==> 1023 watts of power
20 sq. ft evac. tube - 45% eff. ==> 837 watts
800 sq. ft roof area - 15% eff. ==> 11,160 watts

Of course you could get those flat black plastic pool heaters but it would take 8 of the big ones and about $2500 or more for 8 of those.

One problem with the rooftop waterfall heater is evaporation on the roof. I'm sure that even with that, just the sheer surface area will ensure massive amounts of heat being added. I'll have to test a small version and see how much evaporation affects it and how much make up water would be needed. But like they say, "Surface area is king". Another thing to consider is the color of your roof. A black roof will be much more efficient than a grey roof or a red roof, etc. Also, remember that the water is actually touching the hot surface. Unlike normal, where the heat has to transfer through a metal pipe or plastic just to get to the water.

Richard

Monday, June 29, 2009

Pizza Box Solar Oven

I first noticed the pizza box solar oven about 2 weeks ago. But everyone that tried it could not get it to work right. I figured that the problem was that the inside had aluminum foil on it that was not painted black. And a slight thermal mass was needed inside. So, I started to search to see if someone had painted the inside black and got one to work. I found these videos on youtube in 4 parts.


Richard

Friday, June 26, 2009

Cheap source of bearings

One of the toughest things to find over the last few years has been bearings. Especially when I was looking for free or nearly free. I have a friend that would give me a couple every now and then but that was few and far between. Usually, when I was testing a windmill blade design or vertical axis wind turbine design, I would have to order some bearings. After getting a shaft and two bearings plus shipping, the cost was about $70 or so. That was just too expensive and just too limiting. For the kind of testing I do, I needed more than a couple of bearings. I need several sets. They need to be cheap and readily available without ordering through the mail or driving 30 minutes to go to a specialty store.

Well, a couple of months ago, I found just the place. A thrift store. Yep, a thrift store. I found a skateboard for $2 one day and thought I would try it. I found out that the skateboards and the roller blades use the "608" bearing. After some research I found that each bearing can support up to about 900 lbs radially and up to about 400 lbs axially. Each skateboard or rollerblade wheel has 2 bearings inside. The weight pushing down on the wheels would be radial load. In theory each wheel could handle 1800 lbs of downward thrust, except for the fact that the rubber in the wheels would squish around the edge of the bearing and stop it from turning due to friction. Not sure what "real world" weight limit would be with the rubber wheels, but it is significant for brief periods. When you slide sideways, while skating, that is the axial thrust. But don't be tricked here. The axial load limit isn't doubled due to two bearings in this case. Only one bearing at a time takes that load depending on which way the slide is. That is why they have two bearings.
The inside diameter of a 608 is 8 mm, but I found that I can use a 5/16 bolt to hold it. It is slightly smaller and that is what the skateboard chuck uses anyway. And you can find a skateboard every so often in a thrift store. But what you always find is roller blades. I saw 6 sets of rollerblades just 2 days ago in a thrift store for $5 a pair. That is 96 bearings for $30. You really can't beat that. I would recommend getting the adult sizes of roller blades because the smaller sizes may use cheaper bearings.

You can also find many videos on http://youtube.com about taking the bearings out and cleaning and relubing. A lot of people use a good bearing oil but they don't seem to understand that with oil you have to relube once a week or more often. Oil is light and does make the wheel spin faster with your hands, but real world testing with oil and grease show that grease is just as fast under load after the first 20 to 30 seconds of warmup. And a greased bearing can go for months or even years without having to be cleaned and relubed. So, if you are doing windmill applications, please grease the bearings. It waterproofs the bearings, it pulls dirt away from the roller surfaces, and requires much less maintenance.

Here is the bottom bearing for a 65 lb vertical windmill I was testing.


But remember, in this case the bottom bearing is supporting all the weight and that is axial load. So, 400 lbs would be the limit. Although, I would say 200 lbs would be the limit just to be safe. Especially since these bearings are meant to have radial thrust most of the time. The radial thrust in this case would be from the wind and up to 3600 lbs of that would cause the wood to snap very easily and the wind would be hurricane forces.

By the way, this test didn't work that great. Adding more blades helps, but a regular savonious works better.

Richard

Thursday, June 25, 2009

Nature Mill indoor composter


This composter looks nice and very fast. It does consume 10 watts of power but it looks really convenient. I suppose it could be run off of solar power though. In the video they talk about lowering greenhouse gas emissions. This wouldn't do that. When plant matter breaks down in compost or in the woods, doesn't matter, it releases the same amount of water vapor and carbon dioxide ultimately. Just the speed in which it happens changes.

But, it is convenient and it saves loads of garbage going to the dump therefore saves in fuel costs for the garbage trucks and prevents greenhouse gases from that aspect.

It also replenishes the soil. Think of it this way. We humans are like machines. We grow enough food to "almost" feed all 6.5 billion of us. In doing so, we suck out all the nutrients from the soil as it is stored in the food. We eat the food and then it ends up in the sewer and then to a processing plant. So, most of it never gets back to the soil where it belongs. We are effectively pumping billions of pounds a day of nutrients from the soil and putting it elsewhere. That is really bad. We are methodically stripping just the nutrients from the soil and it is slowly rendering our food void of any value except to make us feel full. In other words, we as a species are slowly killing ourselves because we find composting toilets distasteful. Hmmmm, maybe we should rethink our positions.

Richard

Wednesday, June 24, 2009

Making some extra money for the summer

Well, the summer is always slow for my book sales. So, I've decided to make some extra cash by making arbors. I've made a couple before in the past just for me and my girlfriend. But this one is a step up and I'm selling it locally for $195 Canadian dollars. This is my first test, so we'll see how this one sells. Selling one a week would be nice, at least for the summer.

Since this is painted white it doesn't have to be cedar. In this case I used spruce and fir, much cheaper. It is always cool to design something on the computer or paper and then have it turn into reality. It always amazes me.

Richard

DIY Worm Farm Composter

I looked at several videos and this is the most straight forward and easy to follow.


This is really great. You can have a composter right in the kitchen without all the smell or flies. It would certainly be easier to just open this and put in the scraps as opposed to carrying it out to the big composter outside. Plus, you don't have to wait years to have useable dirt. Pretty much at any time you can get a good handful of dirt and worms to add to the garden. Or if you wanted to go fishing, then worms are readily available anytime. Also, the water in the bottom bin is like a tonic for plants. You can use it and dilute with some more water to use in the garden. You could even put a tap on the bottom bin to make it easier. Of course, you would have to put the whole setup up on a higher surface to be able to collect the water in something.

Richard

Tuesday, June 23, 2009

Refrigerator uses no power

This refrigerator is an ice box and has no freezer. This guy built it over 20 years ago. He doesn't say what the refrigerant is but he said it boiled at about -20F. That sounds like ammonia to me. Although ammonia boils at -27F. It is a huge box that holds 300 gallons of water and has 16 plus inches of insulation around the tank. The tank is galvanized metal with a plastic liner. Copper tubes filled with ammonia connect to baseboard units that are outside and placed higher than the refrigerator.

So, how it works...

Whenever the temp of the water is greater than -27F then the ammonia is a gas that fills the tubes under slight pressure. When the temperature outside is cold enough (below freezing), the ammonia will condense on the walls of the copper tubing. The condensed ammonia drips down to the fridge where it absorbs the heat from the 300 gallons of water. It then boils to a gas again. The process continues until the water turns into a 300 gallon block of ice. The only moving part is a cutoff valve. It is shut at this point to prevent everything in the fridge from freezing. The ice will last until the next winter, or I should say that some of it will and maintain the fridge temps.

I would take it a few steps forward though. I would design it so that it was like a chest freezer so the door opened on the top. This would make it way more efficient. Then I would let the ice get much colder in the winter and have a fridge and a freezer section. The fridge section would have more insulation between it and the ice so that it doesn't get as cold. The freezer section would have no insulation on the part touching the ice.

Just so you know, 300 gallons take a lot of space and it weighs a lot. It weighs 2500 lbs and takes up 40 cubic feet. If you laid that down so that it was a chest fridge/freezer then you could make the water container 30 inches deep, 70 inches long and 33 inches wide. Then you need 16 inches all around for insulation. It would be a big unit but the storage would be shallow, maybe 13 inches deep for the fridge (so you can get a 2 liter bottle in it standing up). And deeper for the freezer section because that section is submerged with ice around it.

I found this in wikipedia.
In 400 BC Iran, Persian engineers had already mastered the technique of storing ice in the middle of summer in the desert. The ice was brought in during the winters from nearby mountains in bulk amounts, and stored in specially designed, naturally cooled refrigerators, called yakhchal (meaning ice storage). This was a large underground space (up to 5000 m³) that had thick walls (at least two meters at the base) made out of a special mortar called sārooj, composed of sand, clay, egg whites, lime, goat hair, and ash in specific proportions, and which was known to be resistant to heat transfer. This mixture was thought to be completely water impenetrable. The space often had access to a Qanat, and often contained a system of windcatchers which could easily bring temperatures inside the space down to frigid levels on summer days. The ice was then used to chill treats for royalty on such occasions.

Richard

Monday, June 22, 2009

2 litre 50 watt light

This video was made in Brazil and it is subtitled in English.

I really like this idea and think it is fantastic for tropical and impoverished areas. But our houses in north America are a little different. It is probably possible to make a "solar tube" using the 4 inch aluminum ventilation tubes and a 2 litre. But it hit me that a lot of houses in suburbia have no windows facing the neighbors (for privacy). So, the front and the back have plenty of windows, but none on the ends. It is the case were I live now. And the sun hits that wall in the living room. If I didn't rent here, I would probably make this modification.

Just fill 3 or 4 two litre bottles with cheap isopropyl alcohol so it can't freeze. If you live in a really warm climate you could just use water. Then place high up on the wall. Use silicone to seal around the hole. I was also thinking that a small wooden frame could be made, like 6 inch square and fill in between the wood with rice paper. It would be a nice wall sconce, cheap and homemade.

And 4 of these would be like 4 lamps at 50 watts each lighting up the room, but with natural sunlight.

Richard

Friday, June 19, 2009

Thermosiphon Solar Air Heater with heat storage


This is a solar air heater that uses the sun's heat to pump air into the house. It also stores heat into a bed of rock. Even after the sun sets, the heat from the rocks will still cause the thermosiphon effect to continue to work. After the sun sets, an insulated cover should be placed over the solar collector. Cheap double pane tempered safety glass can be found for free or really cheap at a glass shop. Just ask for used sliding glass doors. If they have moisture between the layers then that is easily fixed. When the glass heats up in the sun, it will steam the moisture out. You can then re silicone the edges between the glass sheets. I can pick these doors up for $20 each from the local glass shop. They told me any glass sitting outside is there to be thrown out so I can have that stuff for free.

For the inside of the solar collector, just use corrugated sheet metal roofing. Just sandwich two pieces and screw together. This forms chanels and gives more surface area for heat transfer. Paint the side facing the sun with high temp flat black spray paint. They sell that paint for barbeques.

Richard

Thursday, June 18, 2009

Homemade DIY Battery Desulfator / Charger


I had posted a video on youtube.com a few weeks ago showing my first very crude and simple battery charger/desulfator. Someone commented on how well it worked for repairing nicads. I'd like to explain that a bit. The nicads don't get sulfated like lead acid, but they do degrade. Little microscopic filaments that look like hair build up and eventually short out the plates. When you hook up a regular charger and it is trying to charge at half an amp, it does that by putting out a fixed voltage. The battery plates are so "fuzzy" that it never takes a charge.

But the desulfator / charger is a constant current device. If you set it for half an amp by using a 12 microfarad "Run" capacitor, then it will push half an amp at whatever voltage it needs. It can go as high as 170 volts DC. And then it pulses it 120 times a second. Believe me, that fries those little hairs pretty quickly. Then the voltage drops down to normal and you can charge for a few hours after that. I normally put a timer on it so it doesn't overcharge.

If you have a nicad pack that is charged at half an amp, don't set up the charger to push 3 amps into it. (or if you do, don't do it for too long) That is bad for the battery and could be dangerous. You change the amps by putting in a different capacitor. A 24 MFD capacitor will charge at 1 amp. A 50 MFD would be just over 2 amps.

You can see the post here that talks about making one. http://poormanguides.blogspot.com/2009/05/updated-chargerdesulfator.html

There are so many old nicad battery packs out there just waiting to be fixed.

Richard

Wednesday, June 17, 2009

Solar Powered Trike

I did something like this to my trike years ago as a test. I used 3 small solar panels that trickle charged the 3 batteries. It was good enough to ride once or twice a week. These show much bigger solar panels and you could ride once a day for a good distance. I like the overhead version better. The one in the picture below looks like it would be hard to see the road. The one above looks like it would get some sun no matter which way you are facing and it would also keep the rain off on those rainy days.

You can find more at http://www.solartrike.com/electricrecumbenttrike.html

And here is an instructable http://www.instructables.com/id/Solar-Powered-Trike/


Richard

Tuesday, June 16, 2009

Wall Mount Solar Oven

This is a great idea. Every house should have a built in solar oven right in or near the kitchen. I know, that would mean the builder would have to consider functionality of the house instead of just appearance. One thing you could do is have a heater element in the oven just for the rainy days or at night. That way it would be your one oven in the kitchen. It's nice putting things in the solar oven in the morning and you don't have to worry about burning it. Something most people don't realize is that when you are cooking and there is water content in the food, then the food never gets over boiling temp. At sea level, that is 212 F. So, when you bake a chicken in the oven for an hour, it doesn't get over 212F until the moisture is gone. Of course, by then the chicken looks like the turkey on the "Christmas Vacation" movie with Chevy Chase. So, a solar oven will cook the ckicken, but it may take 4 or 5 hours to do it. When you look at a turkey thermometer, it doesn't show ready until about 190 F even though you are cooking at 375 F.
You can read more about them at these sites:
http://solarcooking.org/wallovn1.htm
http://solarcooking.org/bkerr/DoItYouself.htm

Richard

Monday, June 15, 2009

Maglev wind turbine


I'm sure most of you have seen this, but I thought I would talk about it. The maglev wind turbine uses powerful rare earth magnets instead of bearings. They are arranged in such a way as to repulse each other and makes it so that the moving outer shell and blades rotate while riding on a cushion of magnetism. This makes the turbine more efficient but also means that extremely large turbines can be made. The one in this picture is about 4,000 to 5,000 feet tall. The foot print for the whole device is 100 acres and produces up to 1,000 megawatts. That is about 2,100 feet square at the base. The inside cylinder would be about 700 feet in diameter. The project would cost $54 million to make, but I think they should spend more and use the internal cylinder for housing and stores. That is about 300,000 square feet per floor at about 400 floors, or 120 million square feet. By contrast, the two world trade center buildings had 10 million square feet of office space. You could easily house 100,000 people inside the turbine as a self sustaining city with its own power generation, rain water collection, lower level massive worm farm for processing sewage and compost. I could go on, but you get the picture.

Let's compare cost between other power generation options.

Technology..........Acre/MW ........cost per MW
=====================================
Wind Farm............ 60......... $1.2 - 2.6 million
Nuclear.................. 2.5............... $2 million
maglev................... 0.1................ $54,000

Notice that the footprint for the maglev is incredibly small for what you get. You could take an existing windfarm, get rid of a couple of turbines and put the maglev in that spot. Also, the first city to make one of these will have more tourism than imaginable. The only real problem is that they use rare earth magnets. I don't know how much neodymium there is, but it could be a problem. But, uranium is rare too and this blows nuclear power away. Maglev is 97% cheaper and has a 25 times smaller footprint. Even less when you think about how much land is used up in mining uranium and storing spent fuel and waste.

Richard

Friday, June 12, 2009

Battery powered lawn mower

I did this for a neighbor a few years ago but I can't find the pictures. He had an electric like this, 8 amp, 120 volts.
I added a piece of plywood to the base of the handle and placed a small 12 volt battery and a 800 watt inverter. I charged it with a small solar panel in the shed. The inverter was cheap, but it had a "soft start" feature. The lawnmower also worked as a small portable power station. I used it for cutting the grass, then I would plug the weed eater into it and then the hedge trimmer. Worked great.

Richard

Thursday, June 11, 2009

DIY Homemade Dump Load

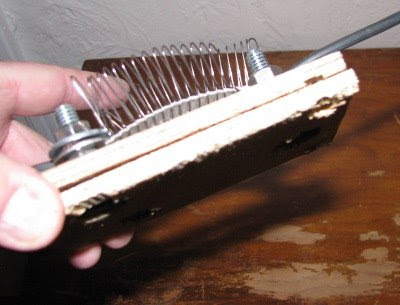
This is a simple dump load for a small wind turbine. Depending on how you wire it up it can be
either 125 watts, 250 watts, or 500 watts all for about 14 volts. Or you can run all in series at 28 volts and get 500 watts.

For instance, if the top left connector is labeled "A" and bottom left is called "B" and the right one is "C", then we can say the following:

at 14 volts:
A to C = 250 watts
B to C = 250 watts
A to B = 125 watts
A and B to C = 500 watts

at 28 volts:
A to C = 1,000 watts (wire will melt)
B to C = 1,000 watts (wire will melt)
A to B = 500 watts
A and B to C = 2,000 watts (house will burn down)

I just used some nichrome heating element out of a $2 electric heater I picked up at a thrift store. I hooked a 12 volt battery to it. I knew that close to 20 amps was my safe limit for that thickness wire. And I wanted dumping to happen at just over 14 volts and knowing that as soon as dumping started the battery would drop to 14 volts or less. And 14 x 20 is 280 watts. I decided on 250 watts per section for safety and to make it last longer. 250 watts divided by 14 volts is about 18 amps. And 14 volts divided by 18 amps is 0.778 ohms.

I had my stainless steel bolt hooked up so I could read amps like in this blog entry.

The battery was at 12.7 volts and dropped to 12.3 volts when I connected the heater element across it. And 12.3 divided by 0.778 ohms is 15.8 amps. So, I moved a jumper down the heating element until I read 15.8 amps on my meter (15.8 milivolts actually, but that equated to amps due to my shunt resistance). I then cut two lengths of that heater element. (just a note, battery voltage wasn't 12.3 until I had a short enough length to draw 15.8 amps. When I first hooked up the battery to the whole coil, it only drew about half an amp or about 6 watts. So the battery was still at 12.7 volts. When I moved the jumper amps and battery voltage changed accordingly.)

I then just used two thin pieces of plywood, stainless bolts and washers and put it all together like in the pictures. The electrical tape was just in case it was placed on something metal, I didn't want anything to short out. The plywood on the bottom was thick enough, so I didn't really need to worry about it though.


There was enough nichrome wire left to make lots of these.

This stuff is so cool. I really love my job!

Richard

First large scale floating wind turbine


I noticed this story in the news.

http://w1.siemens.com/press/en/pressrelease/2009/renewable_energy/ere200906064.htm

Siemens and StatoilHydro install first floating wind turbine.

This is interesting because it makes deep water wind farms much easier. All the NIMBY (not in my back yard) guys can't really argue with this one. And the guys that think turbines kill birds (same guys that don't know that neighborhood and feral cats kill more birds than anything by far) can't really argue with this one either. And even though it is a cool idea, I can't help but feel "too little, too late."
When gas is $7 a gallon and energy costs are way to high and resources are limited, those NIMBY guys will be begging for a wind turbine in their neighborhood. I, personally, think that windmills are beautiful and very relaxing to watch. I don't see what the big deal is. And if you give the locals discounts on their power, most would be happy to have a windmill close (within reason).

I know what you're thinking. You think I might be offending some NIMBY folk, but I'm sure they don't read my blog....not yet. ;)

Richard

Wednesday, June 10, 2009

update on the worm farm composter


Here is the modified picture of the diy worm farm composter that Wretha modified. You can find her blog here.


Ben said, "I have been looking at buying a composting toilet but they are kind of pricey. This may be a good alternative for me. I was wondering if the compost needs to be removed regularly like with the composting toilets I have been reading about or if I can just hook it up and forget about it. This is a great blog. Lots of god information. Keep up the good work."

Well, I would guess that the two 55 gallon barrels would be enough for one toilet and grey water for a small house. If you have 2 bathrooms then I would say use two sets, or 4 barrels. You are right, this is a great alternative to purchasing a $2,000 plus composting toilet. I would also guess that if it is enough to handle your daily use, then you wouldn't have to touch the system. It should be self sustaining. But maybe I'm wrong. I'm gonna look more into it and see what I can figure out.

You would need to live on a hill so it could gravity drain to the gardens, or you could have them above ground and dirt piled up against them. Or you could still bury them and use a solar powered pump.

Richard

Tuesday, June 9, 2009

Solar Air Conditioning


This goes back to something the Romans actually did. It is called a solar chimney. It turns out that the soil about 5 feet underground remains a constant temperature year round. For instance, on the southern tip of Vancouver Island it is about 52 F year round. We don't really need air conditioning though. But a lot of furnaces bring in fresh air, so why not preheat that air from 30 F up to 52 F? So, we could use part of this system as well.

With the solar chimney, the sun heats the air in a black metal pipe or a black box acting like a solar oven. When the air gets hot it rises, but it is connected through the attic to a ceiling vent. If the windows are all closed, then this causes a suction in the house. That suction causes air to come into a lower vent that connects to a pipe or pipes that run underground like in the picture above. The pipe isn't under the house, it is just buried in the yard about 5 to 6 feet deep.

There is a lot of math involved, but you could assume certain things. First, use the 4 inch pvc pipe. Secondly, you will need about 50 feet of it per 60 - 80 cfm of air flow you need. And you would want to use a solar chimney for each pvc pipe you use. Thirdly, use one pipe for every main room in your house. If you had a dining room, kitchen, 3 bedrooms, living room and 2 bathrooms (just ignore the bathrooms) then you would need 6 pvc pipes and 6 solar chimneys on the roof. The pvc pipe would join up in a common place when they enter the house and the solar chimneys would all be running parallel. You don't have 6 seperate ceiling vents and 6 seperate cold air vents coming in.

And it is better to run 2 lengths of 50 feet than to run one at 100 feet. You get 120 - 160 cfm, plus twice the surface area for cooling.

This page talks about using the pipes with your current AC fan.
http://mb-soft.com/solar/saving.html

Warning: the above page is very long but full of some great info.

Also, if you live in a place with dry soil or if your ground temp is closer to 60 F than 50, then you will want a few more pipes. Even more if your ground temp is closer to 70 F.

But I would like to point out something because it may not hit home until you read the above link. A 50 foot pipe that is 4 inches in diameter touches over 50 square feet of soil. At 52 F soil temp, then that is about 15,000 BTU/hr cooling. After about an hour the soil temp starts to rise and eventually you are down to about 5,000 BTU/hr. But if you were just cooling one room, then it is perfect. Not because 5,000 BTU/hr is perfect for a small room, but because if you are cooling a small room, then it gets cool and you shut the system down. This gives the soil time to cool off again around the pipe. If you try to cool a whole house with the one pipe, it never would cool enough and it would run all the time and the soil temp rises and it stops cooling completely.

I am sad that all new houses weren't built with this kind of thing in mind. It can save over 100 kWh per day in the summer per house that uses this type of setup. Even if it isn't solar chimney but underground piping and existing air handler in the home. A 200 to 600 watt fan sure beats a 5,000 to 10,000 watt compressor. Imagine if the housing boom just didn't create big Mcmansions that cost more (for no good reason) but it created new houses that could add value to society. All that energy and money wasted and nothing to show for it except houses that will use up energy like nobody's business and will fall apart (due to shoddy construction and cheap parts) within 10 years. And what is really sad, a system like this could be installed by the builder for less than $1,000. But instead, that builder chose to pay more than that for a conventional air conditioner. And the system talked about on the above link uses your existing air conditioner minus the compressor. So, once it is designed and built correctly, it acts just like a conventional AC, but almost energy free. Or you could use solar and batteries for the AC fan at that point.

Richard

Monday, June 8, 2009

update on the worm farm composter


Here is an updated picture of the idea from Wretha. Just click on the small picture to see the larger one. Notice that air flow goes in one barrel and out the other. I divided grey water and sewage, but really I was just dividing the load between the two barrels. Yes, pun intended :)

You can put compost in either one though. You can have gravity drain for the water output or use a pump (solar powered ideally). Also, the vent pipe is black so it will heat up and act as a solar chimney. As the hot air rises, it sucks air in through the other tank cap.

Also, since the sewage is on the right, it goes through the first worm compost, sand, gravel then through the other gravel in the left bin before exiting.

Sunday, June 7, 2009

DIY Grid Tie


Well, finally finished my ebook on Do it Yourself Grid Tie.

This e-book will show you the following:

  • How asynchronous grid tie works
  • Make pulleys, any size you want out of plywood, super easy
  • Make an automated Poor Man's Power Point Tracker (solar or wind)
  • Homemade grid tie inverter - solar can grid tie with this!
  • Use your windmill with an AC motor to "backfeed" the grid
  • Charging batteries using grid tie (for emergency backup)
  • Make a simple wind speed sensor to engage the grid tie at the right time
Richard

Saturday, June 6, 2009

Worm Farm - Poor Man Style

Worm Farm - Poor Man Style


This is in response to Wretha in the previous' post comment. This is two 55 gallon blue plastic barrels per their idea. I didn't spend a lot of time on this but let me know if I forgot something.

Richard

Friday, June 5, 2009

Worm Farm Composter

I found this on http://www.wormfarm.com.au/domestic.php . It is a worm farm in a tank that you bury underground. It can take all of your houses sewage and grey water and there is a compost cap on top that sticks out of the ground. You can throw ALL kitchen waste, including meat, into it. You can also throw all paper and cardboard into it. It eliminates 75% of your garbage.The water that comes out the bottom is odorless and full of worm castings and great for the garden. This system is meant to replace or be used instead of a septic system.

Richard

Thursday, June 4, 2009

Bubble Wrap Windows - super insulation


Some of you might have seen this done before but I found it interesting. The article I read said that this guy's house was really well insulated except the windows. He had upgraded some of the single paned windows to double glazing but it was expensive. He decided to test bubble wrap. The bubble side faced the window while the smooth side faced inside the house. On a cold day he put his hand on the 2 paned windows and it was way better than the single paned ones. But then he touched the single paned window with bubble wrap and it was worlds of difference from the double glazed window. Not even in the same ball park. He said he can do each window for about $2.

So, it looks like a great way to let light inside during the cold months but still retain that heat. I love the fact that it is cheap and easy and that it out performs the expensive alternative.

Richard

Wednesday, June 3, 2009

AC Grid Tie update

Well, good news. I successfully pumped 42 watts into the grid last night. As you can see, I'm just testing using a DC motor to drive an AC induction motor from a clothes dryer. The DC motor is on the left. It is geared at 3.5 to 1.5 or 2.33:1. Just a word about pulleys. I know that the pulley on the right is 1 inch, but the outside of the belt is the load carrying part. So, measure from the center of the pulley to the outer edge of the belt and then double.
Below, you can see a close up of the AC motor.
I can't find any numbers on it but I believe it is a 1/4 hp. But something to remember about dryer motors with centrifugal switches is that they have two sets of windings. They both start in parallel and once the speed is up to a certain point, then just one winding is used to maintain speed. So, a 1/4 hp motor is really closer to 1/2 hp when both windings are being used. But you can't run them both together once it gets up to speed due to the start winding being out of phase with the run winding. It will work but sound funny and be very inefficient. And if this were used in a windmill, then the wind would be a natural cooling. In the summer time that would mean a doubling of possible power and in the winter about 3 times the power can be expected. So, if you bypass the centrifugal switch and connect to just the run windings then you can expect .5 hp up to 3/4 hp as a max. So, 375 watts in the summer up to about 550 watts in the winter.

I also played around with using the centrifugal switch to connect to the grid once the speed was up. But just like I thought, it would stay connected even after the DC motor was turned off. So, I figure a simple trigger mechanism that triggers on at a certain windspeed and shuts off again once the wind slows down again.

Later today or tonight I'll measure amps and voltage going into the DC motor and compare the input power to the AC grid tie power to determine efficiency of this setup.

Also, I don't like using the V belt on that little tiny pulley on the AC motor. It means that the tension on the belt has to be quite high to keep it from slipping at the higher wattage. It also means the belt heats up quite a bit more due to the constant extreme bending around that tight radius. If I used a 3 inch pulley on the AC motor and used a 7 foot blade set turning a big homemade plywood pulley, it would have to be about 18 inches to start grid feeding at about 10 mph wind.

Richard

Tuesday, June 2, 2009

Super efficient fridge

I came across this awhile back. Some people were taking a chest freezer and running it like a fridge. It makes sense too. Cold air is heavier than warm air, so when you open up a regular fridge, then the cold air "falls" out to the ground. But in a chest freezer or fridge that doesn't happen, the cold air is trapped. That makes the chest freezer or fridge incredibly more efficient for its size than a stand up type.
The simple way to do it is to take a freezer and put an external thermometer nearby. The probe will go inside the freezer and sense when to turn it off or on. The power for the freezer goes through the external thermometer and literally turns the power off or on, just like plugging it in or unplugging it when it needs to. Here is what that device looks like.
This is what that thermometer looks like and here is a closer look.
A typical fridge may use 1.8 kwh per day or 1800 watt hours per day. Solar powered at 5 hours of effective full power sun a day would mean 1800/5 = 360 watts of solar panels or about $2500 just to run the fridge. Some examples with running a freezer like a fridge shows roughly 100 to 300 watt hours per day for about 16 cubic feet. So, worse case, 300/5 = 60 watt solar panel or about $400 instead of $2500. They make $2000 Sun Frost fridges meant for solar power, but this method is as low power as theirs and you can do it with a $200 freezer, not a $2,000 device. You can find this device here but you might could find it cheaper elsewhere as well.

Richard


Monday, June 1, 2009

Solar Powered Hot Tub

There are probably hundreds of ways to make a solar powered hot tub, but today I'll be just referring to my specific situation. For example, I know that if the hot tub were raised on a platform, then I could make a thermosiphon that would require no pump at all. But it would also mean that I would need to make an expensive platform and also I would need some way to shut down the thermosiphon when the temp gets too hot or too cold.

But, right now, I have the hot tub pump that shuts itself off when the thermostat says so. And hooking it up will be super simple. I will just separate the pump from the hot tub and tap into the pump output section and just run that through 50 feet of black garden hose.
The hose would be wrapped and secured on a 2 foot by 2 foot piece of plywood painted black. The plywood will be the back of a solar hot box and a piece of glass or other glazing on the front. It should raise the water in the hose up to 180 or a little more during the heat of the day. The hose wouldn't be under any pressure, so it won't burst. But I live in the pacific northwest. Living in the desert of the south west, things would be different. But even if it started to boil, then it would just expand back into the hot tub.

So, 4 square feet at about 50% efficiency is about 240 watts or about 800 BTUs per hour. The hose would have 1.1 gallons or 9.1 pounds of water inside. And 800 BTUs divided by 9.1 pounds = 88 degrees F. And 88 plus 105 F (starting temp of the water) would be 193. The solar box won't be that well made, because I will make it quickly and cheaply, so it may only peak at about 170F or so. If I get 5 hours of effective full power sun for the whole day, then that means 4000 BTUs per day. The hot tub holds 220 gallons or 1826 pounds of water. So, I could use the sun to recover 2.2 F per day. I could double that number by using a 3 foot by 3 foot solar box, but I would have to use 100 feet of hose, otherwise the water would be boiling in the hose. That 5 hours is based on solar photovoltaic panels. The early morning and late afternoon sun doesn't make much power and may not make enough to reach battery voltages, therefore can't charge. But in solar thermal applications, any heat is good. You just have to make up enough heat to overcome any losses in heat from you heat collector. So, 6 or 7 hours may be closer to a good estimate here.

So, let's say that the hot tub is at 105F and the thermostat shuts the pump down at 11am. From 11am to 12pm the temp drops to 104F and the pump kicks on again. At that point there is a 20 to 30 second insurge of 170F or so of water. That could scald if you are sitting up against a jet. So it is better to either turn on the jets 30 seconds before you get in and leave them on. Or, just turn the hot tub off when you get in.

I may make 2 or 3 of these hot boxes and just use one in the summer. When the weather starts getting cooler, I will add the second and then third boxes to the mix. Then, during the winter, just disconnect them and put them away until April or so.

My hot tub is already pretty energy efficient. It is a "softtub" and it has no heaters. The waste heat from the pump motor is captured and put into the water to heat the water up. Adding heat with solar will mean that I could easily run the hot tub from my small PV array and still have plenty of power left over.
Also, I'll have it on a timer so that it turns off at 6pm and comes back on in the morning at 9am. That way I don't hear the motor at night and also if it ran at night with this setup then the heat would escape through the hose.

Richard